16 September 2010

My Creative Space: Doily Bunting


When we goccoed CD sleeves on the weekend we also goccoed and stamped on some paper doilies. I am a big fan of the doily. And when I was thinking about decorating the venue for the wedding, I was thinking about it in the 'holy crap I only have two weeks left' way so making some buntings with old paper and doilies and lace (I am still obsessed with lace) seemed like a good idea.
I didn't plan on making anything pink but since the interior of the venue is quite wooden-y (they have nice light wooden panelling all around) I needed a bit of contrast. No muted earthy tones for me! Anyway I like these. And they are all made by me!*

*no husbands were harmed or emasculated during the goccoing of these paper doilies

Quick Tutorial for fans of the doily:


You need:
- paper (scrapbooking paper or old book pages or both)
- paper doilies
- stamps (optional) or gocco print
- bias tape
- lace ribbon 

* Using pinking scissors, cut scrapbook paper and/or vintage book pages to the shape of a bunting flag. The easiest way to do this is to fold the paper in half and cut diagonally across, so you end up with one pointed edge. You can either make all the bunting flags the same size or mix it up by creating different sized ones.
* Optional: Decorate your paper doilies using stamps - OR as we did you can also print or gocco an image onto the doily. We printed the same image used for our invitations, and used a stamp of the Eiffel tower (we got engaged in Paris - it was awkward, because my response was "aren't we already engaged". But that's another story)
* Fold about 10-20 centimetres of the top of each doily down towards the back of the doily, NOT the side you stamped on.  You will sew across the straight stretch of doily created by the fold.
* Set your sewing machine stitch length to 3-4
* Cut about 1,5 to 2 metres of bias tape AND your lace border or ribbon
* Fold the bias tape in half lengthwise, so the two folded edges are on the inside, and place the lace border on top. You can pin if you want to, I didn't (surprise)
* Start top stitching the bias tape and lace border, using a quilting foot if you have one, which gives you a 1/4 inch seam guide. If not, use your regular foot as a seam guide and make sure you sew towards the centre or left border of the bias tape.
* To make bunting, alternate doilies and paper bunting flags and place between the two layers of bias tape. Top stitch.
* Alternate paper bunting flag and doily and place about 20 centimetres apart.

More spaces hot off the press here

14 September 2010

Pretty Ugly

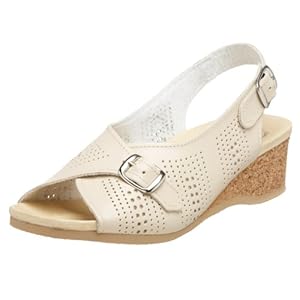
Do you think these are ugly? Because I kind of believe they are cute. Or am I going insane? Who cares!
Apparently they are German old lady shoes that have found their way into celebrity wardrobes. I have been faithful to my Birkies for so long but I think it may be time to upgrade to these babies available on Amazon.

13 September 2010

Wedding CD Sleeves Gocco


Here is what we gocco'ed on Saturday night : CD sleeves which we will use as place cards for the wedding. They will also contain a butt-kicking mix of our favourite tunes - and double up as "favours" (no home made jam at my wedding thanks).  The CD sleeves are recycled paper ones, by Ecocern.
We used the same design and image we gocco'ed on our wedding invitations. Now we just need to pack them into our big suitcase, take them on the plane to Munich, and get ready to par-tay! I hope our guests will like them too!


12 September 2010

sick weekend


I am sick and tired! Not of anything or anyone, just sick again and tired also.

On Saturday me and the husband visited the ladies at Harvest Textiles. We did the advanced screenprinting class. Loved the class and I think the Harvest girls are all top notch excellent. I had not done any preparation work for it and so I took along some things I'd drawn along the way and designed something from scratch. I am quite happy with the result. Not so much my colour choice though.

Then I made the best Lemon and Rosemary Potato Roast Chicken, found on my favourite food blog Ezra Pound Cake (which I love for its name alone AND the recipes too). Then we did a late evening gocco session for the wedding. I am totally over the whole "DIY" wedding thing - it's very much the wedding look du jour but it's turning into a decidedly off-the-rack trend that has a distinct "made in China" flavour. I think if I see one more picture of a homemade jam favour label, I will quietly implode. So I have been avoiding wedding blogs and generally focussed on making buntings and goccoing CD sleeves. More on that later!

My fabric 

Talented husband fabric
Screens drying
PAINT!!
Busy peeps printing away in the calm space that is the Ink & Spindle studio!
Hands up, chicken hands up
Midnight Gocco 

10 September 2010

Would you look at these boots?!

Image viat Meet Me at Mikes
Pip blogged about these this morning and quite frankly I think I can't live without them.

09 September 2010

My Creative Space


... this week is in Illustrator. 

I've been doing some Illustrator training and in the spirit of putting my money where my mouth is (and after my post yesterday about starting my very own business) I've been working on putting some plans into action.

More spaces at Kirsty's !

08 September 2010

Pipedream Progress


So as some of you may know I have played around with ideas for a little small business for a while but i was never brave enough to do it. But then my dad died, and he left me with some very good advice: well he told me to just do it. So I am doing it. Not just for my dad but for myself. I've decided to not return to full time work for now, and I'm setting everything up and crossing my fingers and toes that it will work.

I've researched, practiced, enrolled into a few courses and worked on my products. I want to sell something really good, with a really strong focus on ethical and recycled materials. I think my ideas are good, but some days my confidence isn't all that great. I have always been a very cautious person and at school I was always the one who wouldn't climb up stuff and most certainly not jump down. But the last few months have taught me that risking an uncomfortable landing is what it's all about.

Are you doing something similar? I have started talking to people who are on a similar path (for example the excellent Anne - hello Anne!)

 Today I am sharing some things I have found really useful along the way, so far. About starting out!

* This book. I really enjoyed reading the interviews with a great variety of crafters who run a business doing what they love. Not all of them have a creative degree. I found this reassuring. I am a University nerd and I studied all kinds of totally not very practical things such as Neurolinguistics and wrote an entire thesis on Alice in Wonderland. So my instinct is to go to the library to find answers to my questions, and I feel like if I haven't studied it, I'm not qualified. That is of course not true. But it is a relatively new concept to me to go with your gut and trust that what you love doing is what you're really good at. I'm willing to believe though!

Craft Inc by Meg Mateo Ilasco
* I don't think you need a University degree in "creative" to be creative, but you do need skills to make a truly great product. I've loved skilling up to make my stuff really good. I did some courses at CAE and Tafe and of course also Harvest (Harvest rocks!) to get some experience and work out where my strengths and weaknesses are. I think it's fun and it also gives you confidence to sell products if you've invested in making them well. There are also some great courses on running a craft business at Craft Victoria. Apparently courses that you do to develop a business are tax deductible too, says Alfred my tax man.

* I've met with some great peeps over the last weeks who have all been helpful, inspiring, kind and encouraging. Once I have my new website up and running there will be a huge thank you page just for them. I think emailing people and asking for advice is always a good idea and talking to people who already run a business is fantastic. I was a bit shy about approaching people but it turns out there is no need.

* I have done a lot of work on trying to understand things like income tax, GST, etc... the essentials of running a small business. I am disnumeric and rather foolish so this was important to me as I am not going to run this business with anyone supporting me financially. So I've got to make sure I don't end up in disaster if it fails! Hayley recommended some great internet sites to me that have all been ace to use. They are: Creative Empire , White Hot Truth and I also like Itty Biz. I hope these may help you too! 

* I've been thinking about sustainability a lot. I think there is just no way to start a business or even an idea these days without considering the effect it will have on the environment and how we will live in the future. I decided pretty early on that I was going to work mainly with recycled materials, because I am a big believer in recycling and reusing. And we all know I spend most of my free time hovering in op shops. The bits of material I need that I can't source I want to be fair trade and organic if possible. I think it's important to understand what those terms mean, mainly so you can are not just paying for the 'organic' price tag on supplies, but can be sure that they were actually produced and made to the standard you want, and are truly organic if they claim to be. Some info is available at Ethical Clothing Australia and Carbon Neutral Australia. I am doing research on organic fabrics now and will fill you in later if you're interested. 

And finally, I liked this post by Lara of Ink and Spindle - just to remind myself that almost everything starts with a (pipe) dream!

06 September 2010

A Special Present


My mother in law gave me this dressing gown - it was handmade by her own mother during the war.
She had to save up fabric coupons to be able to buy the only fabric that was available - curtain fabric - and she hand stitched this so she would have a dressing gown to wear on her honeymoon. It's a very special keepsake!

03 September 2010

Fitness for Nerds


Do you know John Green? He is one of my favourite young adult authors. He also video blogs with his brother and they run something excellent called the Nerdfighters. It's fighting for nerds. Not against nerds.
If you are also a nerd, like me, and like books, why not follow John's excellent workout for nerds. I may just give it a shot.

Happy Weekend!

02 September 2010

My Creative Space

And basting, and hoping, and wishing, and basting...
nice lines courtesy of the walking foot
And the completed top!
finished back - featuring a bit of my own fabric screenprinted at Harvest


I spent a lovely few days at the beach shack working on a baby quilt, and it is the first quilt I ever made with wadding and, erm, actual quilting... It's a present for some lovely friends who are expecting their first baby.
I took my darning foot in the hope of doing some freestyle quilting, but boy, that was the last time I tried that. Donning some washing up gloves and attempting to wrangle the quilt through the poor Bernina swearing loudly at 8 in the morning is not an experience I want to repeat. All I managed to produce were some sad lines that looked like worms. So I decided to quilt it in the ditch, which is just a fancy way of saying follow the lines. I used a newly purchased walking foot, which works great, if you work out how to attach it to the machine (thank you husband with the relevant skills). And I basted the heck out of it too - I didn't pay much attention to the basting process first, which resulted in the quilt practically eating itself when I started the stitching. It just bunched up like a Victorian frock. So I did it again, and I really hated that part and was prepared to declare that quilting is not my thing. I just had to repeat 'pins are your friends' as I downed coffees and basted until my knees were getting sore from crawling around on the floor. But when I sewed those lines and the quilt turned into that lovely quilty texture I did get quite hooked on the process. I do love the result, particularly the texture. I love the fabrics too. They seem special to me now that I am using what I have in my stash and not buying any new fabric so that I can downsize and start focussing on using recycled fabric.

More spaces over at Kootoyoo.

31 August 2010

It is all yellow


  After an almost two week hiatus where I just felt like sleeping and hiding I have decided that it's time for some brighter times.
The advantage of owning canary yellow pants has previously been documented by Mrs Rummeybear and I recommend to anyone who is sick of winter and rain to put on a pair. Not only do they cheer you up immensly, they also enable you to seamlessly blend into Melbourne's public transport environment (see above), and strangers stop you in the street to yell "I love your summery pants!" Add some yummy coloured wool to knit with on the train (looks a bit like smurf vomit when in a ball but knitted it's scrumptious) and hello spring! 
Oh and I made the bag this weekend. First bag I ever made. The colours remind me of icecream!

26 August 2010

My Creative Space: Coffee Sack Upholstery


This week I had a lot of things to finish off and I also unravelled my chunky crochet cowl 3 times (I will now knit it because I don't like how the crochet turned the wool quite stiff). So as a flight or fight response I went and upholstered one of our opped lounge chairs with some coffee sacks I picked up in Collingwood. I am very pleased with the result. I tried to document the process step by step but the pictures did not turn out very well, I added a few examples above. Just a load of, erm, coffee sack shots !
The sacks were pretty much the width of the lower chair cushion so I just needed to cut the sacks to size, even the sides out a little and add a zipper. Also some very rigorous zig zagging was needed, even over the zipper, because this stuff frays like there is no tomorrow. I also recommend vacuuming the sewing machine if you ever work with these pretty things because the little strings of fiber get in every potentially damaging spot.

The upper cushion was a bit tougher because it's attached to the back of the chair so I had to basically sew that to size and then pull it over the seat and cut some holes into the side of the fabric where the armrest connects. I have an urge to sand the chair down now because I'd love to get the orange tinge off and reveal the nice wood underneath but given my previous track record sanding things to their demise I will stay well clear off my beloved little sanding machine!

For more creative spaces pop over to la Kirsty

22 August 2010

hood snaps


I really like where we live. And I really like Melbourne. I usually walk
around with my iphone camera app open and i snap absolutely everything.

And a very Happy Birthday husband! This year the birthday cupcakes read
Oh! ZOMG! 3. 2. There were only 4, that's why.
I do like to photograph you a lot, and you do
pull the best faces.